In this tutorial, I'll demonstrate how to protect the API with OAuth 2 protocol. The API is built with Grape, and mounted under Ruby on Rails.
This tutorial was originally written in Chinese, so if you know Chinese please read this: OAuth 2.0 Tutorial: Grape API 整合 Doorkeeper.
To protect the API with OAuth 2, we have to build the following things:
- Resource Owner - The role who can grant authorization to the 3rd-party application, i.e. the User.
- Authorization Server - Everything about authorization goes here, such as:
- Clients - We need a basic CRUD interface to manage clients (applications).
- Access Token (Model) - We need a Model to store Access Tokens.
- Authorization Endpoint - Here to process Auth Code Grant and Implicit Grant flows.
- Token Endpoint - The Access Tokens are actually issued here.
- Resource Server - A location for applications to access, i.e. the API. Some APIs that need Access Tokens to access are called "Protected Resources."
- Guard on Resource Server - To protect some APIs from accessing them without Access Tokens.
Most components are implemented with existing solutions:
- Resource Owner (User) - Devise
- Authorization Server (OAuth 2 Provider) - Doorkeeper
- Resource Server (API) - Grape
- Guard - Manually integrated Rack::OAuth2 into Grape.
Since doorkeeper_for from Doorkeeper can only be used in Rails, and Rack::OAuth2 is simply a Rack Middleware, so we have to mash them up manually. I've written a simple review for the current solutions: 〈Ruby / Rails 的 OAuth 2 整合方案簡單評比〉 (Chinese only; may be translated into English someday)
I've put the whole process in chitsaou/oauth2-api-sample repository. Each step has a corresponding step-x tag, for example the result of Step 1 is available at step-1 tag.
Step 1: Build Resource Owner Business Logic (User)
As mentioned above, we'll build it with Devise. This should be the basics of every Rails Developer, so I'm going to skip the details. Check out step-1 tag for the result.
You can try access /pages/secret and it should ask you to login.
Step 2: Build the Resource Server (API)
Here I'm building the API with Grape, because I don't want the request pass through too many stacks on Rails.
This is simple, and not the key part of this tutorial. If you hit any problems, just check the official document. Check out step-2 tag for the result.
Step 3: Build the Authorization Server (Provider)
It's based on Rails, so I'm going to use Doorkeeper. Check out step-3 tag for the result.
There is a video tutorial on RailsCasts which is worth checkout. However it is not that hard if we follow the official document:
Install the Doorkeeper Gem
# Gemfile
gem 'doorkeeper'
Don't forget to run bundle install.
Then run the following command to install:
$ rails generate doorkeeper:install
$ rails generate doorkeeper:migration
$ rake db:migrate
Then change the configuration file to make the Doorkeeper authenticate Resource Owner with Devise:
# config/initializers/doorkeeper.rb

# Authenticate Resource Owner with Devise
resource_owner_authenticator do
  current_user || warden.authenticate!(:scope => :user)
end
That's all. We have built a Authorization Server.
Doorkeeper creates the foolowing tables:
- oauth_applications - The registry for Clients
- oauth_access_grants - The registry of Auth Codes (issued during the first step of Authroization Code Grant Type Flow)
- oauth_access_tokens - Stores the Access Tokens that actually issued, including the corresponding Refresh Tokens (disabled by default)
Doorkeeper registers the following Routes:
| Method (REST) | Path | For |
|---|---|---|
| new | /oauth/authorize | Authorization Endpoint |
| create | /oauth/authorize | Action when User grants the authorization request |
| destroy | /oauth/authorize | Action when User denies the authorization request |
| show | /oauth/authorize/:code | (For local test?) |
| update | /oauth/authorize | (Unknown Update Grant?) |
| create | /oauth/token | Token Endpoint |
| show | /oauth/token/info | Token Debug Endpoint |
| resources | /oauth/applications | Clients Management (CURD) |
| index | /oauth/authorized_applications | Resource Owner manages the authorized Clients |
| destroy | /oauth/authorized_applications/:id | Resource Owner manages the authorized Clients |
The show action of Authorization Endpoint displays the grant code only, which I think is for local testing; the update actions has on actual method to catch it, not sure whether it is a dead feature or not.
You can found that:
- It gives Authorization Endpoint & Token Endpoint.
- It gives Token Debug Endpoint, which can be used to verify the Token in Implicit Flow.
- It comes with a Clients management interface.
- It also comes with a interface for users to manage authorized Clients.
Doorkeeper provides everything that an Authorization Server needs.
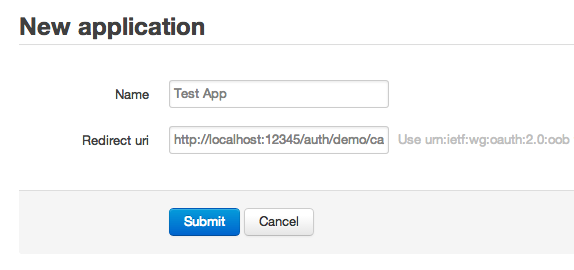
Step 3.1: Create a Client for Testing
After Authorization Server is built, we can now create a new Client. Open /oauth/applications/new and fill http://localhost:12345/auth/demo/callback in Redirect URI field, and submit. There does not have to be a web server on localhost:12345. We can still grab the grant code or token for testing.
Step 3.2: Get Access Token
Now we can try to get the Access Token. We're going to simulate the Client to run the Authorization Code Grant Flow. Here is how:
First, open the show page of the Client that we just created. You'll see a page displaying the Application ID, Secret and other info about the Client. At the bottom of the page, there is a Authorize link. Click it and it'll open the following location:
http://localhost:9999/oauth/authorize
    ?client_id=4a407c6a8d3c75e17a5560d0d0e4507c77b047940db6df882c86aaeac2c788d6
    &redirect_uri=http%3A%2F%2Flocalhost%3A12345%2Fauth%2Fdemo%2Fcallback
    &response_type=code
(Note: assume this Rails App runs on localhost:9999; additional line breaks are inserted for readability)
As the grant flow spec describes, the Client now sends a request to Authorization Endpoint for a Grant Code, presenting its Redirect URI and Client ID.
Now it (Doorkeeper) asks you (Resoruce Owner) whether to Authorize or Deny. We're going to select Authorize here.
It then navigates you to a location that the browser cannot open, which is the Redirect URI that we assigned when creating the app. But don't worry, we've got the Grant Code:
http://localhost:12345/auth/demo/callback
    ?code=21e1c81db4e619a23d4ed46134884104225d4189baa005220bd9b358be8b591a
          ^^^^^^^^^^^^^^^^^^^^^^^^^^^^^^^^^^^^^^^^^^^^^^^^^^^^^^^^^^^^^^^^
          Grant Code
If you have noticed that during Step 3.1, the client creation page hints you to fill urn:ietf:wg:oauth:2.0:oob in Redirect URI field, and you actually did, then the grant code will be displayed in the show action. This behavior is for local testing, which is like one of Google OAuth 2.0's workflows.
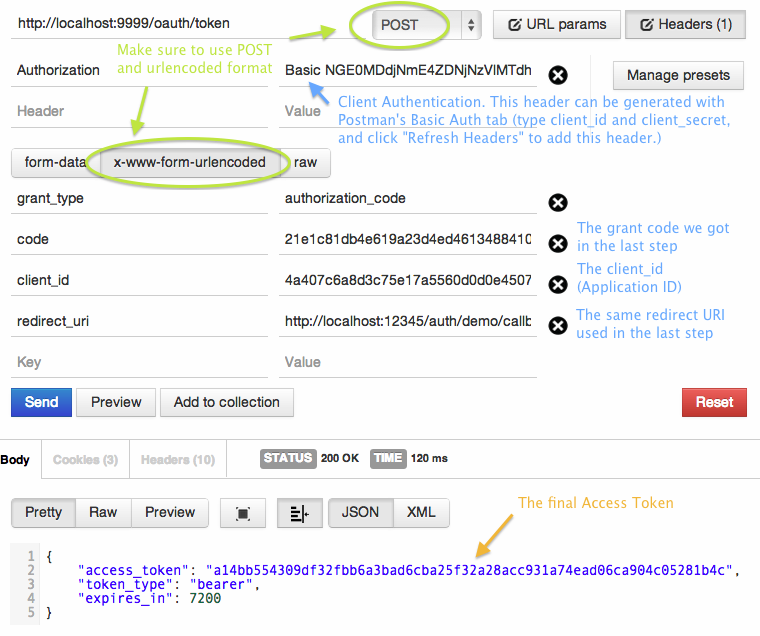
Now the Client has got the Grant Code. According to the spec, the Client should exchange the Grant Code for the actual Access Token through a back channel to Authorization Server.
Because there are too many arguments to fill, here I put the screenshot of Postman. Fill the form and hit Send, then you'll get the Access Token!
Step 4: Build the Guard on Resource Server
This is the most difficult part in the tutorial. As I said in the last article (Chinese only), if the API is built with Grape, then no any Guard solution can be used immediately. If you build your API with Rails, the doorkeeper_for guard is currently not fully implemented. My current solution is taking Bearer Token middleware of Rack::OAuth2 and attach it onto Grape, and also used some logic from doorkeeper_for.
I'll detail this step as much as possible. Check out step-4 tag for the result.
The guard module is made with ActiveSupport::Concern, and put in api/concerns/api_guard.rb.
Step 4.1: Install Rack Middleware to "Fetch" Access Token (String)
When installing (use) the Rack::OAuth2 Middleware, we have to provide it a block, which will be called by the middleware. However, it will only be called if ahe request comes with an OAuth2 Token, that is:
- It calls the block if the request comes with
Authorization: Bearer XXX(header) or?access_token=xxx(query param) - It does not call the block if the request does not have the arguments above, instead it passes to the next middleware stack (!)
Besides, this Middleware does only store the return value of block call into request.env["some key"], which means that it is used to "fetch" the Access Token, not used for checking whether the Access Token is valid and let the request complete. We have to check the validity of Access Token in the API layer.
So we install this Middleware but only use it to fetch the Access Token string:
# api/concerns/api_guard.rb
included do
  # OAuth2 Resource Server Authentication
  use Rack::OAuth2::Server::Resource::Bearer, 'The API' do |request|
    # The authenticator only fetches the raw token string

    # Must yield access token to store it in the env
    request.access_token
  end
end
Step 4.2: Make a Private Method to Take Out the Fetched Access Token (String)
I've mentioned above that the Middleware stores the Token in request.env. Actually it is stored inrequest.env[Rack::OAuth2::Server::Resource::ACCESS_TOKEN]. So let's take it out:
# api/concerns/api_guard.rb
helpers do
  private
  def get_token_string
    # The token was stored after the authenticator was invoked.
    # It could be nil. The authenticator does not check its existence.
    request.env[Rack::OAuth2::Server::Resource::ACCESS_TOKEN]
  end
end
Step 4.3: Make a Private Method to Convert Token String to Instance
Token String is simply a String, and we still have to find the actual Access Token instance in the data model. I read the logic in doorkeeper_for helper, and learned that I can invoke its AccessToken.authenticate directly, which would return an instance if found, nil if not found:
# api/concerns/api_guard.rb
  helpers do
    private
    def find_access_token(token_string)
      Doorkeeper::AccessToken.authenticate(token_string)
    end
  end
Step 4.4: Make a Service to verify Access Token
This service is built as a module called OAuth2::AccessTokenValidationService. I put it in app/services. It validates the token is not expired, not revoked, and has sufficient scopes. The "expired" and "revoked" are validated with Doorkeeper::AccessToken's built-in methods. The sufficiency of scopes validates whether the authorized scopes is equal to or more than the required scopes. The validator retruns one of the four constants defined in that module: VALID, EXPIRED, REVOKED and INSUFFICIENT_SCOPE.
I put validate_access_token helper in Grape Endpoint to make it easier to access, which directly return the result of validation, i.e. the four results mentioned above. The caller can then determine how to response according to the validation result:
# api/concerns/api_guard.rb
helpers do
  private
  def validate_access_token(access_token, scopes)
    OAuth2::AccessTokenValidationService.validate(access_token, scopes: scopes)
  end
end
The easiest way to compare scope sufficiency is set comparison: if set of authorized scopes is a superset of set of required scopes, then the scope is sufficient; otherwise it is insufficient. However if you would like to implement a logic like "Scope A includes Scope B," you should use another algorithm.
Here is the simple set comparison algorithm:
- If no scopes required, then any Access Token has sufficient scopes. Returns true.
- If there are scopes required, then compare the two set of scopes to see whether the set of authorized scopes is a superset of set of required scopes.
Ruby comes with a built-in Set datastructure so that we can do this by converting Array to Set.
# app/services/oauth2/access_token_validation_service.rb
protected
def sufficent_scope?(token, scopes)
  if scopes.blank?
    # if no any scopes required, the scopes of token is sufficient.
    return true
  else
    # If there are scopes required, then check whether
    # the set of authorized scopes is a superset of the set of required scopes
    required_scopes = Set.new(scopes)
    authorized_scopes = Set.new(token.scopes)

    return authorized_scopes >= required_scopes
  end
end
Step 4.5: Make the Guard to Deny Request without Valid Access Token
Now we're going to build the guard! method to deny API uses.
In order to make the program flow more clear, an exception for each error situation is defined. We can handle these exceptions with rescue_from in Grape, or raise Rack::OAuth2 built-in exceptions directly in those exceptions.
Here is the logic:
- First, fetch the Token String
- If no Token is given, it means that the Client does not know that it needs to present a token. Raise MissingTokenError.
- According to the spec, the response should have status 401, without any detailed error message.
- If there is a Token, but but found in the database, Raise TokenNotFound.
- According to the spec, the response should have status 401, with "Invalid Token Error."
- If the Token is found in the database, then verify it to see if it can be used to access the API: check if it is expired or revoked. If scopes are required, check the authorized scopes.
- If the result is VALID, assign
@current_userto the Resource Owner (User) bound to the Access Token. - Otherwise, raise respective exceptions.
- According to the spec, if the validation failed due to insufficient scopes, the response should have status 403 with "Insufficient Scope Error," otherwise it should have 401 status code with "Invalid Token Error."
- If the result is VALID, assign
# app/api/concerns/api_guard.rb
helpers do
  def guard!(scopes: [])
    token_string = get_token_string()

    if token_string.blank?
      raise MissingTokenError

    elsif (access_token = find_access_token(token_string)).nil?
      raise TokenNotFoundError

    else
      case validate_access_token(access_token, scopes)
      when Oauth2::AccessTokenValidationService::INSUFFICIENT_SCOPE
        raise InsufficientScopeError.new(scopes)

      when Oauth2::AccessTokenValidationService::EXPIRED
        raise ExpiredError

      when Oauth2::AccessTokenValidationService::REVOKED
        raise RevokedError

      when Oauth2::AccessTokenValidationService::VALID
        @current_user = User.find(access_token.resource_owner_id)

      end
    end
  end
end
Step 4.6: Forward Exceptions to the Exceptions Built-in in Rack::OAuth2
I implemented this by capturing all the exceptons with rescue_from in Grape. You can directly raise it, too.
Notes that:
- There's a set of
error_descriptionstrings in Bearer::ErrorMethods, eacherrorcode has a corresponding description string.- Howerver they're only filled-in automatically when the exceptions are raised from Rack authenticator with corresponding methods (e.g.
insufficiet_scope!.) - They're not filled-in if we call the error responder middlewares directly
- So we have to manually fill them in.
- Howerver they're only filled-in automatically when the exceptions are raised from Rack authenticator with corresponding methods (e.g.
- If the error is due to not presenting a token, we can assume that Client does not know that it has to authenticate.
- So we don't use any
errorcode that is defined in the spec. error_descriptioncan be obmitted too.- Respond 401 with Bearer::Unauthorized middleware.
- So we don't use any
- If the error is due to token not found, expired or revoked, use
invalid_tokenforerrorcode.- Actually we can use the same
error_descriptionstring. - In my implementation, I raise different Exceptions and different
error_descriptions for different errors. - You can use the same error description in your implementation, which still fulfills the requirements of spec.
- Respond 401 with Bearer::Unauthorized middleware.
- Actually we can use the same
- If the error is due to insufficent scope of the token scope, use
insufficient_scopeforerrorcode.- Respond 403 with Bearer::Forbiddden middleware.
- However, in the implmentation of Rack::OAuth2, it does not respond with
WWW-Authenticateheader (actually it is only required in 401 response) - All error message including
scope, will be found in JSON response body. - I've implemented a fork that fills error messages in the
WWW-Authenticateheader.
- My implementation does not care about
error_uriandrealm; therealmwill be fallen back to Rack::OAuth2's default one.
# app/api/concerns/api_guard.rb
included do |base|
  install_error_responders(base)
end

# ...

module ClassMethods
  private
  def install_error_responders(base)
    error_classes = [ MissingTokenError, TokenNotFoundError,
                      ExpiredError, RevokedError, InsufficientScopeError]
    base.send :rescue_from, *error_classes, oauth2_bearer_token_error_handler
  end

  def oauth2_bearer_token_error_handler
    Proc.new {|e|
      response = case e
        when MissingTokenError
          Rack::OAuth2::Server::Resource::Bearer::Unauthorized.new

        when TokenNotFoundError
          Rack::OAuth2::Server::Resource::Bearer::Unauthorized.new(
            :invalid_token,
            "Bad Access Token.")
        # etc. etc.
        end

      response.finish
    }
  end
end
Step 4.7: Make a Guard for the whole API
This usage is copied from doorkeeper_for :all, which is used to "require OAuth 2 Token for all the endpoints under this API." For Grape, it should be implmented as a class method in Grape::API class, so I put it in ClassMethods module. Call it in Grape::API and a before filter will be inserted; all the endpoints will go through that filter.
# app/api/concerns/api_guard.rb
module ClassMethods
  def guard_all!(scopes: [])
    before do
      guard! scopes: scopes
    end
  end
end
Step 4.8: Now We Can Lock Up the API with OAuth 2
Requiring OAuth 2 on a single Endpoint:
# app/api/v1/sample_api.rb
module V1
  class SampleAPI < Base
    get "secret" do
      guard! # Requires a valid OAuth 2 Access Token to use this Endpoint
      { :secret => "only smart guys can see this ;)" }
    end
  end
end
Requiring OAuth 2 on all the endpoints under an API:
# app/api/v1/secret_api.rb
module V1
  class SecretAPI < Base
    guard_all!  # Requires a valid OAuth 2 Access Token to use all Endpoints

    get "secret1" do
      { :secret1 => "Hi, #{current_user.email}" }
    end

    get "secret2" do
      { :secret2 => "only smart guys can see this ;)" }
    end
  end
end
Try It Out!
Request to the endpoint without a valid token will be rejected:
$ curl -i http://localhost:9999/api/v1/secret/secret1.json
HTTP/1.1 401 Unauthorized
WWW-Authenticate: Bearer realm="The API"
Content-Type: application/json
Cache-Control: no-cache

{"error":"unauthorized"}
If we present a valid token, it will pass, and tells me whom the user of that token is:
$ curl -i http://localhost:9999/api/v1/secret/secret1.json \
> -H "Authorization: Bearer a14bb554309df32fbb6a3bad6cba25f32a28acc931a74ead06ca904c05281b4c"
HTTP/1.1 200 OK
Content-Type: application/json
Cache-Control: max-age=0, private, must-revalidate

{"secret1":"Hi, [email protected]"}
Step 5: Using Scope
So far, the OAuth 2 Guard supports "scopes" but the Authorization Server does not support it. How do we restrict some API endpoints must be accessed with an Access Token that was authorized with specific scopes? Here is how. For more details you can read the document of Doorkeeper: Using Scopes. Also check out the source code in step-5 tag.
First, add scope declarations in config/initializers/doorkeeper.rb:
# config/initializers/doorkeeper.rb

# Define access token scopes for your provider
# For more information go to https://github.com/applicake/doorkeeper/wiki/Using-Scopes
default_scopes  :public              # If the Client does not ask for any scopes, use these scopes
optional_scopes :top_secret,         # Other scopes that the Client can ask for
                :el, :psy, :congroo
Don't forget to restart the Rails server.
However if you open "Authorize" link, the URL does not contain scope parameter, which means "the scopes to request." So we have to modify it manually first. Add scope=top_secret parameter, like this:
http://localhost:9999/oauth/authorize
    ?client_id=4a407c6a8d3c75e17a5560d0d0e4507c77b047940db6df882c86aaeac2c788d6
    &redirect_uri=http%3A%2F%2Flocalhost%3A12345%2Fauth%2Fdemo%2Fcallback
    &response_type=code
    &scope=top_secret
It'll ask you whether to authorize or deny, again. So you know that Authorization Server understands whether you have granted the client with specific scopes in the past. After authorization, the client will get another grant code, which can be exchanged for the Access Token, for example I got 5d840a4e43049eb1e66367bc788059f9bf16b53f853f3cd4f001e51a5c95abfd this time.
Now add 2 endpoints in SampleAPI that require specific scopes to access:
get "top_secret" do
  guard! scopes: [:top_secret]
  { :top_secret => "T0P S3CR37 :p" }
end

get "choice_of_sg" do
  guard! scopes: [:el, :psy, :congroo]
  { :says => "El. Psy. Congroo." }
end
If we access top_secret endpoint with the previous Access Token, it will reject:
$ curl -i http://localhost:9999/api/v1/sample/top_secret.json \
> -H "Authorization: Bearer a14bb554309df32fbb6a3bad6cba25f32a28acc931a74ead06ca904c05281b4c"
HTTP/1.1 403 Forbidden
Content-Type: application/json
Cache-Control: no-cache

{
  "error":"insufficient_scope",
  "error_description":"The request requires higher privileges than provided by the access token.",
  "scope":"top_secret"
}
However if we use the new token, it will pass:
$ curl -i http://localhost:9999/api/v1/sample/top_secret.json \
> -H "Authorization: Bearer 5d840a4e43049eb1e66367bc788059f9bf16b53f853f3cd4f001e51a5c95abfd"
HTTP/1.1 200 OK
Content-Type: application/json
Cache-Control: max-age=0, private, must-revalidate

{"top_secret":"T0P S3CR37 :p"}
If we use the new token to access choice_of_sg, it won't pass:
$ curl -i http://localhost:9999/api/v1/sample/choice_of_sg.json \
> -H "Authorization: Bearer 5d840a4e43049eb1e66367bc788059f9bf16b53f853f3cd4f001e51a5c95abfd"
HTTP/1.1 403 Forbidden
Content-Type: application/json
Cache-Control: no-cache

{
  "error":"insufficient_scope",
  "error_description":"The request requires higher privileges than provided by the access token.",
  "scope":"el psy congroo"
}
That's expected, because the scopes does not match. To access choice_of_sg endpoint, we have to get a new access token with required scopes. As mentioned before, we have to build an authorization URL:
http://localhost:9999/oauth/authorize
    ?client_id=4a407c6a8d3c75e17a5560d0d0e4507c77b047940db6df882c86aaeac2c788d6
    &redirect_uri=http%3A%2F%2Flocalhost%3A12345%2Fauth%2Fdemo%2Fcallback
    &response_type=code
    &scope=el%20psy%20congroo
             ^^^   ^^^ space
For multiple scopes, separate them with spaces %20.
This time I got a new token 0b39839282957d8f80c01901c2468ed52341707594897ec9767af392306f1e55. If I access choice_of_sg with the new token, it will pass:
curl -i http://localhost:9999/api/v1/sample/choice_of_sg.json \
-H "Authorization: Bearer 0b39839282957d8f80c01901c2468ed52341707594897ec9767af392306f1e55"
HTTP/1.1 200 OK
Content-Type: application/json
Cache-Control: max-age=0, private, must-revalidate

{"says":"El. Psy. Congroo."}
Conclusion
This tutorial only demos the simplest way to build an OAuth 2 Authorization Server and OAuth 2 Bearer Token Guard to protect Grape API, from scratch. Some features / issues are not covered:
- We have to restrict "who can register new clients", for example, only admins or logged-in users can register. I think this can be done by
admin_authenticatorandenable_application_owneroptions in Doorkeeper. - Did not demo the usage of Refresh Token.
- Doorkeeper cannot disable some grant flows.
- I implmented this feature in my fork, and I also posted a pull request. Maybe the maintainer will merge it someday.
- Since the guard was built manually, some features in Doorkeeper are completely unused, for example:
access_token_methodsoption (the methods which the client can present access tokens with.)- i18n configurations built-in in Doorkeeper.
- The guard does not use the same "realm" parameter in error resopnse.
- The guard does not put parameters in
WWW-Authenticateheader forinsufficient_scopeerror- My fork has implemented this feature, but I haven't post a pull request to the origin.
- Although putting this header in 403 response doesn't make sense, I still feel it better to do this, since other error responses put this too.
- The scope matching is implemented with a simple set comparison, which is not useful for some cases like "A scope includes B scope."
Finally, the Guard is not packaged as a gem. I think I may make a gem someday.