這篇文章示範如何使用 OAuth 2 保護 API ,其中 API 是用 Grape 造出來的,掛在 Rails 底下。
英文版 / English Version: OAuth 2.0 Tutorial: Protect Grape API with Doorkeeper
整個實作流程會造出這些東西:
- Resource Owner - 可以授權給第三方 App 的角色,也就是 User。
- Authorization Server - 用來處理與 OAuth 2 授權有關的事務,像是:
- Clients - 需要有 Clients (Apps) 的 CRUD 。
- Access Token (Model) - 需要有個 Model 來儲存 Access Token 。
- Authorization Endpoint - 這裡來處理 Auth Code Grant 和 Implicit Grant 。
- Token Endpoint - 這裡來真正核發 Token 。
- Resource Server - 給 App 存取的地方,也就是 API ,一部份需要 Access Token 才能存取的叫做 Protected Resource 。
- Resource Server 上面的 Guard - 用途是「保護某些 API ,必須要帶 Access Token 才能存取」,俗稱保全。
本文使用這些套件來實作:
- Resource Owner (User) - Devise
- Authorization Server (OAuth 2 Provider) - Doorkeeper
- Resource Server (API) - Grape
- Guard - 用 Rack::OAuth2 來整合 Grape
因為 Doorkeeper 的 doorkeeper_for 只能用在 Rails ,而 Guard 只是一個 Rack Middleware ,所以這裡要自己拼湊。詳情請見先前的文章 〈Ruby / Rails 的 OAuth 2 整合方案簡單評比〉。
所有過程我都會放在 chitsaou/oauth2-api-sample 這個 repository ,各 step 有對應的 step-x tag ,例如 Step 1 完成的結果可以在 step-1 這個 tag 看到。
Step 1: 造 Resource Owner 邏輯 (User)
用 Devise 做。這個應該是 Rails Developer 的基本功,所以不解釋了,請見 step-1 tag。
可以試著打開 /pages/secret ,會要求登入。
Step 2: 造 Resource Server (API)
用 Grape 是因為不想要讓 API 經過太多 Rails 的 stack。
這個不難,而且不是本文的重點,所以直接看官方文件就好了。成品可以看 step-2 tag 。
Step 3: 造 Authorization Server (Provider)
既然底是 Rails ,那麼就直接上 Doorkeeper 就好了。可以看 step-3 tag 。
RailsCasts 有 tutorial ,若有買 Pro 不妨去看看。不過其實照官方文件做也不難:
安裝 Doorkeeper Gem
# Gemfile
gem 'doorkeeper'
別忘了跑 bundle install 。
然後跑這些來安裝:
$ rails generate doorkeeper:install
$ rails generate doorkeeper:migration
$ rake db:migrate
再照他文件說的去接 Devise 來認證 Resource Owner:
# config/initializers/doorkeeper.rb

# 認證 Resource Owner 的方法,直接接 Devise
resource_owner_authenticator do
  current_user || warden.authenticate!(:scope => :user)
end
這樣就好了。
Doorkeeper 會建這些 model:
- OauthApplication - Clients 的註冊資料庫
- OauthAccessGrant - Auth Code 流程第一步產生的 Auth Grants 的資料庫
- OauthAccessToken - 真正核發出去的 Access Tokens,包含對應的 Refresh Token (預設關閉)
Doorkeeper 開的 Routes 有這些:
| Method (REST) | Path | 用途 |
|---|---|---|
| new | /oauth/authorize | Authorization Endpoint |
| create | /oauth/authorize | User 許可 Authorization 時的 action |
| destroy | /oauth/authorize | User 拒絕 Authorization 時的 action |
| show | /oauth/authorize/:code | (應該是用來 Local 測試的) |
| update | /oauth/authorize | (不明的 update grant) |
| create | /oauth/token | Token Endpoint |
| show | /oauth/token/info | Token Debug Endpoint |
| resources | /oauth/applications | Clients 管理界面 |
| index | /oauth/authorized_applications | Resource Owner 管理授權過的 Clients |
| destroy | /oauth/authorized_applications/:id | Resource Owner 管理授權過的 Clients |
其中 Authorization Endpoint 的 show 只會顯示 grant code ,可能是 Local Testing 要用的;而 update 則是沒有任何 action 去接它,不確定是不是 dead feature 。
可以發現到:
- 幫你蓋好了 Authorization Endpoint 和 Token Endpoint
- 還附加 Token Debug Endpoint ,在 Implicit Flow 可以驗證 Token 的真實性。
- 還有附 Clients 管理界面
- 還可以讓 User 管理授權過的 Clients
所以一個 Authorization Server 該有的東西它都提供了。
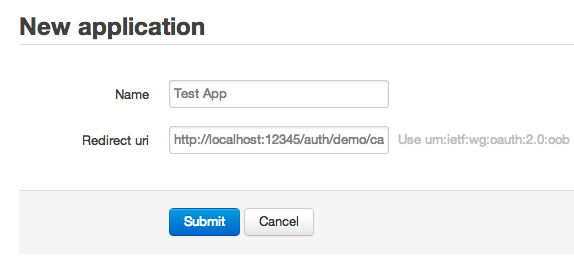
Step 3.1: 開測試用的 Client
蓋完 Authorization Server 之後,要去開一個 Client 。可以打開 /oauth/applications ,其中 Client 的 redierct URI 填入 http://localhost:12345/auth/demo/callback ,實際上沒有跑 Web server 在 localhost:12345 也沒關係,最終目的是拿到 code 或 token。
Step 3.2: 拿取 Access Token
現在可以來試著拿 Access Token 了,我們要用人腦模擬 Client ,來跑 Authorization Code Grant 的流程。
步驟如下:
首先打開剛剛生的 Client 的 show 頁面,會看到有 Application ID 、 Secret 等資訊的頁面。最下面有一個 Authorize 的連結,點下去會打開到這個網址(假設這個 Rails App 開在 localhost:9999 ,下同)(中間斷行比較好讀):
http://localhost:9999/oauth/authorize
    ?client_id=4a407c6a8d3c75e17a5560d0d0e4507c77b047940db6df882c86aaeac2c788d6
    &redirect_uri=http%3A%2F%2Flocalhost%3A12345%2Fauth%2Fdemo%2Fcallback
    &response_type=code
就像之前在流程文裡介紹過的,它用 GET 去 Authorization Endpoint 求 Grant Code ,附上自己的 Client ID 和 Redirection URI 。
接著會問你要 Authorize 還是 Deny ,當然選 Authorize 。
接著會跑到一個瀏覽器打不開的網址,是先前設定的 Redirection URI,不過沒關係,我們已經得到 Grant Code 了(中間斷行比較好讀):
http://localhost:12345/auth/demo/callback
    ?code=21e1c81db4e619a23d4ed46134884104225d4189baa005220bd9b358be8b591a
          ^^^^^^^^^^^^^^^^^^^^^^^^^^^^^^^^^^^^^^^^^^^^^^^^^^^^^^^^^^^^^^^^
          Grant Code
如果在 Step 3.1 照網頁上的指示填入 urn:ietf:wg:oauth:2.0:oob ,最後會出現 grant code 的 show 頁面,直接把 grant code 曬給你,這是 local 用來測試用的,類似 Google OAuth 2.0 的流程。
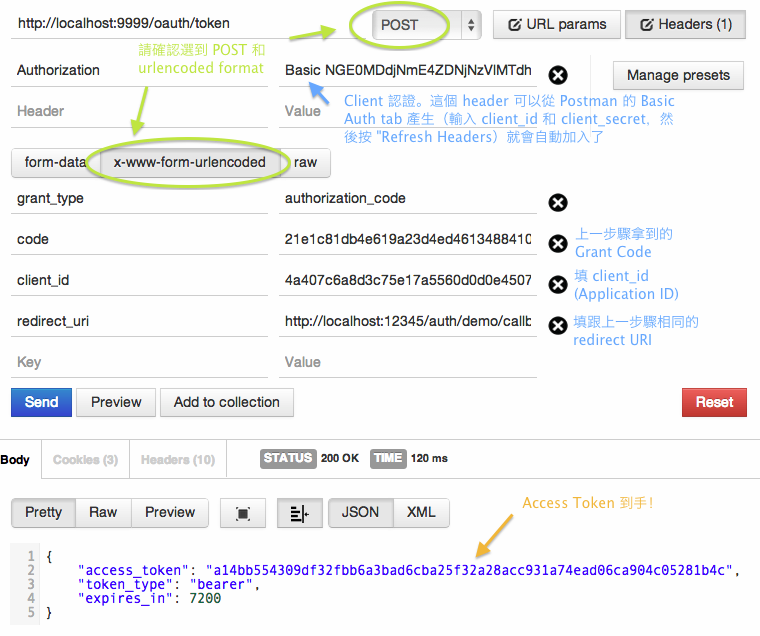
到這裡,Client 就拿到 Grant Code 了,依照流程,接下來是 Client 要另外從後台偷偷去 Authorization Server 把這個 Grant Code 換成 Access Token。
因為要填的資料太多了,我抓一下 Postman 的畫面,填完最後按下「Send」就會拿到 Access Token 了!
Step 4: 造 Resource Server 上的 Guard
造 Guard 這件事比較難,就像我前一篇文章說過的,在 API 是 Grape 的情況下, 沒有一個 Guard 是可以直接拿來用的 ;即使你用 Rails 做 API 好了,doorkeeper_for 現在也還只是半成品。我目前的做法是把 Rack::OAuth2 的 Bearer Token middleware 接到 Grape 上面,邏輯參考了 doorkeeper_for 的實作方式。
這裡會寫得比較仔細。可以看 step-4 tag 。
我寫成一個 module ,用 ActiveSupport::Concern 去簡化 module 化的程式,放在 api/concerns/api_guard.rb。
Step 4.1: 安裝 Rack Middleware 來抓取 Access Token (String)
Rack::OAuth2 這個 Rack Middleware 在安裝 (use) 的時候要傳一個 block ,它會去 call ,但 call 的條件是「Request 有帶 OAuth 2 Token」這樣才會 call ,意思是說:
- 如果 Request 有帶
Authorization: Bearer XXX或?access_token=xxx才會 call - 如果 Request 不帶上述的參數,就不會 call ,直接 pass 到下一個 middleware stack (!)
而且這個 Middleware 在 call 之後其實會把 return value 直接存進 request.env["某個 key"] 裡面,意思就是說 「它只是給你 fetch access token 用的」 ,不能拿來「確認 Access Token 有效並放行 API access」,這件事要在 API 層做。
那麼就來安裝這個 Middleware 吧,但只拿來 fetch access token string :
# api/concerns/api_guard.rb
included do
  # OAuth2 Resource Server Authentication
  use Rack::OAuth2::Server::Resource::Bearer, 'The API' do |request|
    # The authenticator only fetches the raw token string

    # Must yield access token to store it in the env
    request.access_token
  end
end
Step 4.2: 做一個 private method 來取出先前拿到的 Access Token (String)
前文提到 Middleware 會把 Token 存在 request.env 裡面,具體就是 request.env[Rack::OAuth2::Server::Resource::ACCESS_TOKEN] ,所以就把它拿出來吧。
# api/concerns/api_guard.rb
helpers do
  private
  def get_token_string
    # The token was stored after the authenticator was invoked.
    # It could be nil. The authenticator does not check its existence.
    request.env[Rack::OAuth2::Server::Resource::ACCESS_TOKEN]
  end
end
Step 4.3: 做一個 private method 來把 Token String 變成 Instance
Token String 只是單純的字串,還需要去 Database 裡面撈才能換成 Instance 。參考了 doorkeeper_for 的做法,我直接呼叫它的 AccessToken.authenticate ,撈不到會直接回 nil:
# api/concerns/api_guard.rb
helpers do
  private
  def find_access_token(token_string)
    Doorkeeper::AccessToken.authenticate(token_string)
  end
end
Step 4.4: 做一個 service 來驗證 Access Token 是否合法
OAuth2::AccessTokenValidationService 我放在 app/service 裡面,其中會驗證是否過期 (expired) 、是否被撤銷 (revoked) ,這兩個都是 Doorkeeper::AccessToken 內建的 methods。但此外還要驗證所需的 scopes 是否包含在 Access Token 的 scopes 裡面。回傳的驗證結果會是 VALID 、 EXPIRED 、 REVOKED 、 INSUFFICIENT_SCOPE 四個常數的其中一個(定義在該 module 裡面)。
在 Grape Endpoint 放一個 validate_access_token helper 來方便處理這件事,它會直接回傳結果,也就是上述四個之中的一個, caller 就可以根據驗證結果決定要怎麼回 response 。
# api/concerns/api_guard.rb
helpers do
  private
  def validate_access_token(access_token, scopes)
    OAuth2::AccessTokenValidationService.validate(access_token, scopes: scopes)
  end
end
在 Service 裡面要驗證 scopes ,我的演算法其實很簡單,就是集合比較而已;有的網站會有「A scope 包含 B scope」的設計,如果要做成這樣的話,就不能用單純的集合比較了。純集合比較的演算法是這樣:
- 如果沒有要求任何 scopes ,那其實任何 Access Token 都符合,就回 true。
- 如果有要求任何 scopes ,那麼「授權過的 scopes」就得是「所需的 scopes」的宇集,剛好 Ruby 有內建 Set 這個資料結構,把兩個 Array 都轉成 Set 就能方便比較了。
# app/services/oauth2/access_token_validation_service.rb
protected
def sufficent_scope?(token, scopes)
  if scopes.blank?
    # if no any scopes required, the scopes of token is sufficient.
    return true
  else
    # If there are scopes required, then check whether
    # the set of authorized scopes is a superset of the set of required scopes
    required_scopes = Set.new(scopes)
    authorized_scopes = Set.new(token.scopes)

    return authorized_scopes >= required_scopes
  end
end
Step 4.5: 製作 Guard 來擋住沒有合法 Access Token 的 Requests
現在要真正寫 guard! method 來擋 API use 了。
為了讓程式流程看起來更簡潔,根據不同的錯誤情況,定義了不同的 Exception ,各 Exception 要怎麼處理,則可以交由 Grape 的 rescue_from 處理(我是這樣做的),或 Exception 裡面直接 raise Rack::OAuth2 內建的 exception。
邏輯是這樣:
- 先去抓出 Token String
- 如果沒給 Token ,表示 Client 不知道要認證,丟 MissingTokenError
- 照 spec 是要回 401 但是不給任何錯誤訊息
- 如果有給 Token 但是資料庫裡面找不到,丟 TokenNotFound
- 照 spec 是要回 401 加上 Invalid Token Error
- 如果找得到 Token 則進一步驗證是否可以用來存取該 API (根據有否過期、被撤銷,如果有要求 scope 的話則再檢查 scope)
- 若驗證結果是 VALID ,則把
@current_user指定給該 Access Token 綁定的 Resource Owner (User) - 若驗證結果不是 VALID ,則丟出相對應的 Exceptions
- 照 spec ,如果是因為 scope 不足,則是回 403 加上 Insufficient Scope Error ,其他情況則是要回 401 加上 Invalid Token Error
- 若驗證結果是 VALID ,則把
# app/api/concerns/api_guard.rb
helpers do
  def guard!(scopes: [])
    token_string = get_token_string()

    if token_string.blank?
      raise MissingTokenError

    elsif (access_token = find_access_token(token_string)).nil?
      raise TokenNotFoundError

    else
      case validate_access_token(access_token, scopes)
      when Oauth2::AccessTokenValidationService::INSUFFICIENT_SCOPE
        raise InsufficientScopeError.new(scopes)

      when Oauth2::AccessTokenValidationService::EXPIRED
        raise ExpiredError

      when Oauth2::AccessTokenValidationService::REVOKED
        raise RevokedError

      when Oauth2::AccessTokenValidationService::VALID
        @current_user = User.find(access_token.resource_owner_id)

      end
    end
  end
end
Step 4.6: 把 Exception 轉送到 Rack::OAuth2 內建的錯誤回應方式
我的做法是用 Grape 的 rescue_from 去接 exceptions ,當然要直接 raise 也可以就是了。
要注意的是:
- Bearer::ErrorMethods 有內建一組
error_description的預設值,根據不同的errorcode 去對應- 但只有在 Rack 的 authenticator 裡面使用相對應的 helper method (如
insufficiet_scope!) 才會填入 - 直接 call 這個 middleware 則不會自動填入錯誤訊息
- 所以必須手動填入
- 但只有在 Rack 的 authenticator 裡面使用相對應的 helper method (如
- 沒給 Token 要視為「Client 不知道要 Authenticate」
- 所以
errorcode 不屬於 Spec 裡面定義的任何一個 error_description也不需要給。- 使用 Bearer::Unauthorized 回 401
- 所以
- Token 找不到、過期 (Expired) 、被撤銷 (Revoked) 的
errorcode 都是invalid_token- 其實可以用同一個
error_description - 我的寫法會把三種情況分別丟不同的 Exception,並填入不同的
error_description - 你實作的時候可以用同一個,這並不會違反 spec
- 使用 Bearer::Unauthorized 回 401
- 其實可以用同一個
- Token 的 scope 不足會使用
insufficient_scope的error- 使用 Bearer::Forbidden 回 403
- 可是 Rack::OAuth2 的實作並沒有填入
WWW-Authenticateheader (只有 401 強制要求要填) - 所有的 error message (包括
scope)會出現在 JSON response body 裡面 - 我有另外實作一個 fork ,會一併填入
WWW-Authenticate裡面
- 這個實作沒有填入
error_uri和realm,其realm會使用 Rack::OAuth2 內建的。
# app/api/concerns/api_guard.rb
included do |base|
  install_error_responders(base)
end

# ...

module ClassMethods
  private
  def install_error_responders(base)
    error_classes = [ MissingTokenError, TokenNotFoundError,
                      ExpiredError, RevokedError, InsufficientScopeError]
    base.send :rescue_from, *error_classes, oauth2_bearer_token_error_handler
  end

  def oauth2_bearer_token_error_handler
    Proc.new {|e|
      response = case e
        when MissingTokenError
          Rack::OAuth2::Server::Resource::Bearer::Unauthorized.new

        when TokenNotFoundError
          Rack::OAuth2::Server::Resource::Bearer::Unauthorized.new(
            :invalid_token,
            "Bad Access Token.")
        # etc. etc.
        end

      response.finish
    }
  end
end
Step 4.7: 製作用來擋全 API 的 Guard
這是仿 doorkeeper_for :all 的,用途是「這個 API 底下的所有 Endpoints 都要擋」。在 Grape 的世界裡面,它要是放在 Grape::API 裡面的 class method ,所以我寫在 ClassMethods module 裡面,一 call 就是塞 before filter 進去,它底下每個 endpoint 都會過這個 filter。
# app/api/concerns/api_guard.rb
module ClassMethods
  def guard_all!(scopes: [])
    before do
      guard! scopes: scopes
    end
  end
end
Step 4.8: 現在可以用 OAuth 2 來擋 API 了
單獨擋一個 Endpoint:
# app/api/v1/sample_api.rb
module V1
  class SampleAPI < Base
    get "secret" do
      guard! # Requires a valid OAuth 2 Access Token to use this Endpoint
      { :secret => "only smart guys can see this ;)" }
    end
  end
end
擋一個 API 底下所有 Endpoints:
# app/api/v1/secret_api.rb
module V1
  class SecretAPI < Base
    guard_all!  # Requires a valid OAuth 2 Access Token to use all Endpoints

    get "secret1" do
      { :secret1 => "Hi, #{current_user.email}" }
    end

    get "secret2" do
      { :secret2 => "only smart guys can see this ;)" }
    end
  end
end
試試看!
不帶 Token 就去打 API 會被拒絕:
$ curl -i http://localhost:9999/api/v1/secret/secret1.json
HTTP/1.1 401 Unauthorized
WWW-Authenticate: Bearer realm="The API"
Content-Type: application/json
Cache-Control: no-cache

{"error":"unauthorized"}
附 Token 再去打 API 就沒問題了,並且會告訴我這個 User 是誰:
$ curl -i http://localhost:9999/api/v1/secret/secret1.json \
> -H "Authorization: Bearer a14bb554309df32fbb6a3bad6cba25f32a28acc931a74ead06ca904c05281b4c"
HTTP/1.1 200 OK
Content-Type: application/json
Cache-Control: max-age=0, private, must-revalidate

{"secret1":"Hi, [email protected]"}
Step 5: 使用 Scope
到目前為止,實作出來的 OAuth 2 的 Guard 雖然支援「scopes」,但 Authorization Server 不支援。要怎麼限制某些 API 必須使用「授權了某些 scopes」的 Access Token 才能存取呢?以下是範例,詳細可以參考 Doorkeeper 的文件 Using Scopes 。程式碼見 step-5 tag 。
首先在 config/initializers/doorkeeper.rb 裡面增加 scopes 的定義,例如
# config/initializers/doorkeeper.rb

# Define access token scopes for your provider
# For more information go to https://github.com/applicake/doorkeeper/wiki/Using-Scopes
default_scopes  :public              # 如果 Client 不索取任何 scopes 則預設使用這組 scopes
optional_scopes :top_secret,         # 其他可以額外申請的 scopes
                :el, :psy, :congroo
要重開 Rails server 生效。
接著打開 Authorize 的頁面,點下去的網址不會帶有「想要索取的 scopes」,所以先把網址複製下來,後面手動附上 scope=top_secret 參數:(中間斷行比較好讀)
http://localhost:9999/oauth/authorize
    ?client_id=4a407c6a8d3c75e17a5560d0d0e4507c77b047940db6df882c86aaeac2c788d6
    &redirect_uri=http%3A%2F%2Flocalhost%3A12345%2Fauth%2Fdemo%2Fcallback
    &response_type=code
    &scope=top_secret
到這裡會再問你要不要 Authorize ,所以你知道了 Authorization Server 會區別帶有不同 scopes 的 grants。Authorize 之後會得到一組 grant code ,再照標準流程拿 Token 。我這次拿到的 Token 是 5d840a4e43049eb1e66367bc788059f9bf16b53f853f3cd4f001e51a5c95abfd.
現在我在 SampleAPI 裡面新增兩個 endpoint ,需要 scopes 才能存取:
get "top_secret" do
  guard! scopes: [:top_secret]
  { :top_secret => "T0P S3CR37 :p" }
end

get "choice_of_sg" do
  guard! scopes: [:el, :psy, :congroo]
  { :says => "El. Psy. Congroo." }
end
用之前申請過的 Access Token 來打 top_secret 這個 API 會被拒絕(中間斷行比較好讀):
$ curl -i http://localhost:9999/api/v1/sample/top_secret.json \
> -H "Authorization: Bearer a14bb554309df32fbb6a3bad6cba25f32a28acc931a74ead06ca904c05281b4c"
HTTP/1.1 403 Forbidden
Content-Type: application/json
Cache-Control: no-cache

{
  "error":"insufficient_scope",
  "error_description":"The request requires higher privileges than provided by the access token.",
  "scope":"top_secret"
}
若用新拿到的 Token 就會過了:
$ curl -i http://localhost:9999/api/v1/sample/top_secret.json \
> -H "Authorization: Bearer 5d840a4e43049eb1e66367bc788059f9bf16b53f853f3cd4f001e51a5c95abfd"
HTTP/1.1 200 OK
Content-Type: application/json
Cache-Control: max-age=0, private, must-revalidate

{"top_secret":"T0P S3CR37 :p"}
然而如果拿這個 Token 去打 choice_of_sg 就會被拒絕(中間斷行比較好讀):
$ curl -i http://localhost:9999/api/v1/sample/choice_of_sg.json \
> -H "Authorization: Bearer 5d840a4e43049eb1e66367bc788059f9bf16b53f853f3cd4f001e51a5c95abfd"
HTTP/1.1 403 Forbidden
Content-Type: application/json
Cache-Control: no-cache

{
  "error":"insufficient_scope",
  "error_description":"The request requires higher privileges than provided by the access token.",
  "scope":"el psy congroo"
}
當然,因為 scope 不符啊。這時候就要再重新申請一個 Token ,照前面說過的流程,要先有一個 Authorize 的 URL:
http://localhost:9999/oauth/authorize
    ?client_id=4a407c6a8d3c75e17a5560d0d0e4507c77b047940db6df882c86aaeac2c788d6
    &redirect_uri=http%3A%2F%2Flocalhost%3A12345%2Fauth%2Fdemo%2Fcallback
    &response_type=code
    &scope=el%20psy%20congroo
             ^^^   ^^^ space
多重 scope 的情況下,各 scope 之間用空格 %20 分開。
最後我拿到的新 Token 是 0b39839282957d8f80c01901c2468ed52341707594897ec9767af392306f1e55 。再用它去打 choice_of_sg API 就會回我了:
curl -i http://localhost:9999/api/v1/sample/choice_of_sg.json \
-H "Authorization: Bearer 0b39839282957d8f80c01901c2468ed52341707594897ec9767af392306f1e55"
HTTP/1.1 200 OK
Content-Type: application/json
Cache-Control: max-age=0, private, must-revalidate

{"says":"El. Psy. Congroo."}
結語
以上的 Tutorial 只簡單示範了如何從零建造一個 OAuth 2 Authorization Server 並且用 OAuth 2 Bearer Token 來保護 Grape API 。以下這些問題沒有處理:
- 要可以限制「誰才可以開 Clients」 (例如站長,或是有登入的使用者),我想應該是 Doorkeeper 的
admin_authenticator和enable_application_owneroptions 。 - 沒有示範 Refresh Token
- Doorkeeper 不能設定只要開啟哪些 Grant Flows
- 這我有開一個 fork 出來實作,也貼了 Pull Request ,等他 merge 。
- 因為 Guard 是自己寫的,Doorkeeper 的一些功能完全不使用,例如
access_token_methods(設定 Client 可以用哪些方式向 API 出示 Token) - 承上,也沒有使用到 Doorkeeper 內建的錯誤訊息 i18n 機制
- Guard 的 Error Response 的 "realm" 不同步
- Guard 的
insufficient_scopeError 沒有把參數放在WWW-Authenticateheader- 我的 fork 有實作這個,還沒開 PR 給原版。
- 雖然在 403 放這個 header doesn't make sense ,但總覺得還是統一放在這裡比較好啊…
- Scope 的 matching 只用了簡單的集合比較,不適用於某些 A scope 吃 B scope 情況
又,寫完的 Guard 並沒有包成 Gem 還是什麼的……之後應該會包一下吧。
有任何問題(包括指教本文的謬誤)歡迎在下面的留言板提出 :)